by Amy Luchun AIA, LEED AP and Ben Revelle, RA, LEED AP
Managing expectations is often at the core of a successful project. In construction, with real space, time, money, and people involved, managing expectations means considering the full context within which the project is to be constructed, and then setting expectations that align with that reality.
For many construction systems, especially tilt-up construction, the tool that has been proven to be the best at managing expectations is the mockup panel. The mockup panel, a full-scale sample section made using the same materials, techniques, and personnel that will be used for the project, is critical to the success of any tilt-up project. Depending on the design, there can be many details to test, perfect, and convey; and the design does not only need to be discussed between the design and construction teams, but also with the owner.
There are many reasons why every project team should invest in constructing a comprehensive mockup panel. Through several case studies, this article will demonstrate the application of this practice and show how this method can lead to the following benefits.
Education and Practice – There is often a variety of ways to accomplish any one task. The mockup panel functions as a vehicle for testing techniques and determining how various decisions could affect the schedule, the budget, and the outcome. The test panel also allows the team and owner to become familiar with new materials and technology, allowing for informed decision-making and confidence in the final execution.
Establishing Quality Standards – To what level are we finishing this exposed concrete? How are seams between form liners going to be addressed? How much imperfection will the specified coating conceal? All of these questions and more can be worked out in a mockup panel, which can then be referenced when evaluating the finished product.
Studying Transitions – What happens when one material or finish begins, ends, or turns the corner is often overlooked. Constructing a mockup panel that includes these transitions ensures that design intent aligns with constructability and the capabilities of the finish.
Selecting Materials – Reviewing small material samples and finishes out of context and off-site does not compare to seeing a full-scale selection surrounded by the other chosen systems and materials.
CASE STUDY 1: EDUCATION AND PRACTICE

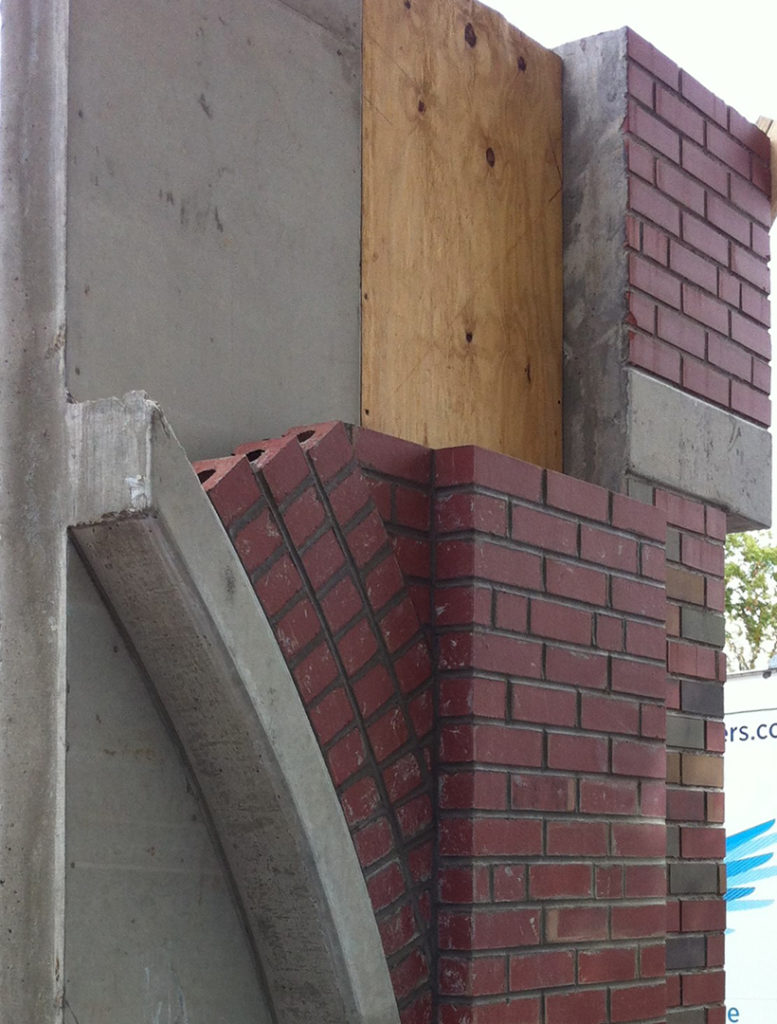
Mockups serve as great educational tools that allow clients to experience a small piece of their building months before the full panels take shape. For example, in this first case study, the final building was a theater addition to a historic school. Tilt-up was proposed as the structural solution not only for cost savings, but also because the client wanted long spans within the space without perimeter columns. It was critical to the client and the school board that the addition’s exterior detailing resembled the existing architecture without precisely matching the older architectural style. Selecting brick colors and blending those colours with the existing façade quickly became an issue. The types of brick on this historic façade were no longer available or in production. Therefore, before the panels were designed and built, the architectural team investigated the color range and texture of numerous thin red bricks that could also be purchased in full sizes. The concept was to use the predominantly red brick as the canvas’s base, and the other colors would then be stained on top of the brick to replicate the school’s green and orange blends. It was important that both full-size and thin bricks were available, since the final design needed both sizes at the transition points of the entrance arches. The painter used a mockup to test color and stain for approval prior to implementing that blend on the final façade.

This particular mockup was needed not only as a basis for design decisions, but also as a teaching and learning aid for the workers from various trades who were involved with the project. From the painter who would perfect the color to the carpenters who would build the final product, many workers benefited from using this mockup as a testing lab. The carpenters who built the framework studied the details of the arched opening, making sure to achieve a structure that was both strong during the concrete placement and curing process and beautiful when the formwork was removed. The team would not take the risk of having untested plans when the concrete trucks arrived to pour the final panels. Instead, they worked closely with the architectural team to revise, test, and refine detail depths — and it turns out those plans would not have been successful, had they been built as originally drawn.
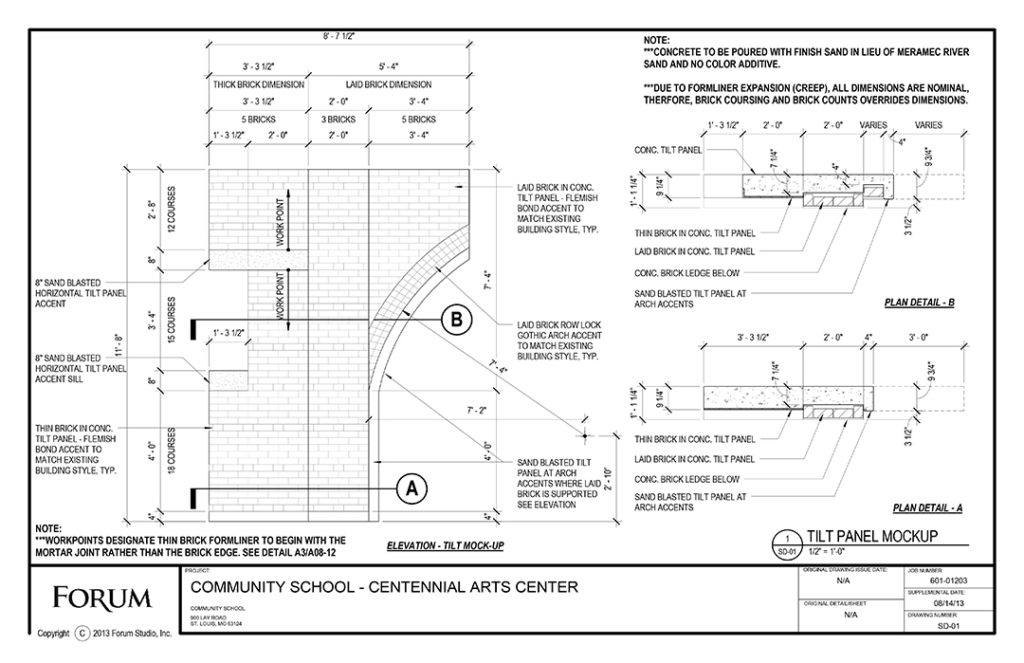
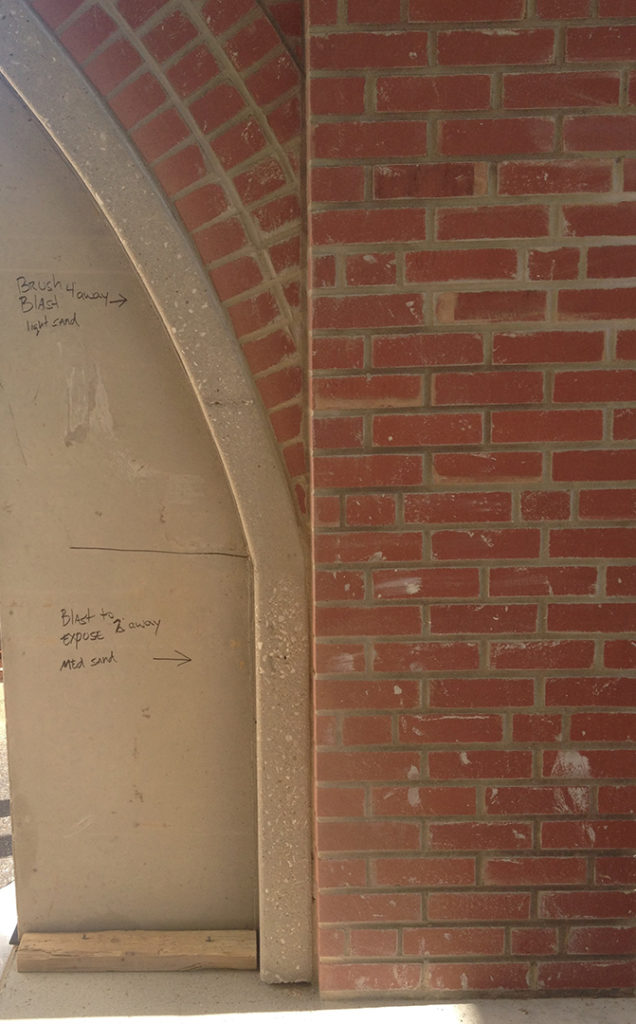
When drawing the mockup to a useable size and scale, the team should list all of the building’s elements that will need to be considered and then incorporate those elements into the mockup. When the team proposed having exposed concrete banding and detailing within the façade as a cost-saving measure, they knew it was another item to be added to this mockup list. It was decided that a sandblast finish could give a modern stone feel to the addition’s aesthetic. As seen in the photos, concrete details were left raw, allowing the team to test different final finishes: a light sandblast and a heavier one. This testing made it possible to achieve the exact finish the client would expect and approve.
CASE STUDY 2: ESTABLISHING QUALITY STANDARDS
The final finish of concrete can be a beautiful element on a building. In the next example, this concept of leaving the finished concrete exposed was taken to a higher level than normal. It was proposed that the final panels would be ground and polished and left as unfinished concrete. From their experience with concrete tilt-up design, however, the team knew that a smooth or polished finish was not easily achieved through traditional formwork methods. This being the case, the team decided to flip their thinking in order to get the look that everyone desired.

A typical concrete tilt-up panel is poured face-down and then lifted up into place so that the finished or exposed face is the one that rests on the casting bed during the curing process. In order to leave the concrete exposed, the process should not occur over a casting bed that has any imperfections, saw cuts, or joints in the bed pour. All of these joints could be translated into the final finish and are virtually impossible to remove. By flipping the panels and pouring them upside-down, the team removed the issue of the imperfect casting beds, allowing for focus on the techniques needed to create a consistent, polished appearance. The process started by testing concrete mix types for color and consistency of aggregate size, knowing this mix would be exposed in the grinding and polishing process. Once a mix was selected, the team poured full-scale panels to test different grinders in order to get the desired finish.

Granted, the panels’ overall design is somewhat typical in size and shape; but it was the process that needed to be refined through the mockup, giving the client and the design team confidence that the panels would be as beautiful as intended and not need the regular painting maintenance that traditional panels require.
CASE STUDY 3: STUDYING TRANSITIONS
Budget and schedule are two important reasons why architects and clients may choose to design with tilt-up concrete. The cost per square foot of exterior skin can be quite expensive, especially when trying to achieve a certain look. With the cost of structural and miscellaneous steel that is required for some façade reliefs, coupled with the potential of water infiltration that can occur when transitioning between materials, a simpler structural solution, such as tilt-up, may be a better choice, as it solves those concerns and still achieves a great design.

In the next case study, the team needed a building to be erected in a very short period of time. The schedule was driving many decisions, the main one being the need for an enclosed structure that would be ready for interior fit-out before winter weather arrived. The use of tilt-up for this design would give some extra time in the schedule to beat that winter weather and still have the rich materials of the façade that the client wanted.
For this mockup, the team used the panels both to select thin brick and to test the other materials that would be added to the panels after they were erected. The mockup was formed and poured on casting beds that were already there for another project under construction. The mockup panels were then placed on a flatbed truck and moved halfway across the country to the project site where the remaining materials were installed. The panels featured an ipe wood inlay and unique metal panel shapes that were attached directly to the face. It was important for all the trades involved with these items to understand the critical transitions and recesses that must occur within the panels to achieve a cohesive design and a fully integrated building envelope. These details are sometimes difficult to convey in drawings, and, therefore, the mockup process was able to help the architect and builder communicate their plans for the panels, helping them achieve maximum quality and the desired design.
CASE STUDY 4: SELECTING MATERIALS
The last mockup case study focuses on what we believe is the future of tilt-up design. This mockup example highlights a collaborative process where a team was able to give the owner, developer, general contractor, architect, and tilt-up contractor involvement in reviewing material selections and working out panel details. This collaboration set the project up for success.

Initially, two mockup panels were produced to test multiple brick sizes, finishes, orientations, and four options for form liner. After initial review, two bricks and one form liner were selected and combined into a final panel. Planning for and procuring all the materials necessary for this type of mockup process requires great communication between the design and construction teams. Such communication helps make sure all needed materials are obtained and timely decisions are made.
These mockups also allow the team to review in detail how materials transition and give insight into what items may need an extra set of eyes when final panels are formed. As part of their typical process for tilt-up projects, the team created a checklist of the items that would need to be verified so that the design team and contractor could sign off on the formed panels prior to the concrete being poured. Reviewing these items with the contractor by going through both the mockup and the checklist is an important step in the ultimate success of the panels.
EVALUATING THE MOCKUP AND FINAL PRODUCT
Ultimately, a mockup can help set shared and reliable expectations for an entire team. For everyone, from the designer to the client to the builder, it is important to know what to expect when the panels are finally in place and all cleaned up. Setting those expectations early on through the process of making a mockup helps guide expectations during the final steps of the building’s construction. Through mockups, a team can set appropriate expectations regarding possible or likely imperfections that could occur during construction and can educate everyone involved on how best to conceptualize the panels.
Evaluating a mockup with a magnifying glass from six inches away is a great way to set yourself up for trouble. Teams should agree on an appropriate distance for reviewing the panel. Review the project specifications, as the TCA guidelines have suggested viewing distances for certain finish levels and relevant tolerances. Either way, the distance from the panel should allow for the panel face to be viewed as a whole, since this is how the majority of the public will initially view the building.
It is also important to consider the weather, time of day, and orientation of your panel when reviewing a mockup. You should make sure the mockup is angled in the sunlight in the same way the building will ultimately be, and make sure the team understands that the façade’s appearance will gradually change as the sun and shadows move across the materials. Be sure to review the tilt-up mockup with as much mimicked final context as possible. If there are other construction methods or materials that will affect how the panels of the final product are perceived, then those elements should be imitated, or at least mentioned, during review of the mockup.
Having the mockup panel on the actual project site can function both as a reference point for the various teams and as an advertisement to observers, showing them what will soon be built. The mockup is a valuable tool for construction projects, whether used solely to select and confirm final building finishes or to address constructability issues, such as material transitions or attachments of other systems that need to be tested and perfected prior to casting the final panels. Mastering the mockup and understanding its uses provides for better management of expectations and efficient, high-quality results.
Be the first to comment